This is the first post in our ECommerce Website Creation using SpringBoot with React. Already we have the video tutorial of the same in YouTube. [Link: ECommerce Website – தமிழில் SpringBoot with React – Part 1 Creating JSON ]
Step 1: Creating Entity Class.
For listing out products, We should have Product Table in Database. Hence, the first step is creating Entity Class for the same.
package com.example.demo.entity;

import jakarta.persistence.Entity;
import jakarta.persistence.GeneratedValue;
import jakarta.persistence.GenerationType;
import jakarta.persistence.Id;
import lombok.AllArgsConstructor;
import lombok.Getter;
import lombok.NoArgsConstructor;


@Entity
@NoArgsConstructor
@AllArgsConstructor
@Getter
public class Product {
	@Id
	@GeneratedValue(strategy=GenerationType.IDENTITY)
	private Long id;
	public Long getId() {
		return id;
	}
	public void setId(Long id) {
		this.id = id;
	}
	public String getName() {
		return name;
	}
	public void setName(String name) {
		this.name = name;
	}
	public String getDescription() {
		return description;
	}
	public void setDescription(String description) {
		this.description = description;
	}
	public String getImg() {
		return img;
	}
	public void setImg(String img) {
		this.img = img;
	}
	public Integer getRating() {
		return rating;
	}
	public void setRating(Integer rating) {
		this.rating = rating;
	}
	public Integer getStock() {
		return stock;
	}
	public void setStock(Integer stock) {
		this.stock = stock;
	}
	public Long getPrice() {
		return price;
	}
	public void setPrice(Long price) {
		this.price = price;
	}
	private String name, description, img;
	private Integer rating, stock;
	private Long price;

}
Step 2: Repository Interface, a Sub Interface of JpaRepository.
Through JPA, We can create tables for the corresponding Entity Classes. For this, we are going to create Repository Interface for Product.
package com.example.demo.repository;

import org.springframework.data.jpa.repository.JpaRepository;
import org.springframework.stereotype.Repository;
import com.example.demo.entity.Product;

@Repository
public interface ProductRepository extends
JpaRepository<Product, Long>{
}
Step 3: Creation of Service Class to consume from Repository
To consume Repository methods such as findAll(), save(product), It is good to create a service class.
package com.example.demo.service;

import java.util.List;

import org.springframework.stereotype.Service;

import com.example.demo.entity.Product;
import com.example.demo.repository.ProductRepository;

@Service
public class ProductService {

	private final ProductRepository repository;

	public ProductService(ProductRepository repository)
	{
		this.repository = repository;
	}

	public List<Product> getAllProducts()
	{
		return repository.findAll();
	}
	public Product addProduct(Product product)
	{
		return repository.save(product);
	}

}
Step 4: Controller Class for mapping requests.
Our Controller class should display all products. To display all products, we should have GetMapping. If User wants to add Product to the Database, PostMapping should be added.
package com.example.demo.controller;

import java.util.List;

import org.springframework.web.bind.annotation.GetMapping;
import org.springframework.web.bind.annotation.PostMapping;
import org.springframework.web.bind.annotation.RequestBody;
import org.springframework.web.bind.annotation.RequestMapping;
import org.springframework.web.bind.annotation.RestController;

import com.example.demo.entity.Product;
import com.example.demo.service.ProductService;

@RestController
@RequestMapping("/api/products")
public class ProductController {

	private final ProductService service;

	public ProductController(ProductService service)
	{
		this.service = service;
	}

	@GetMapping
	public List<Product> showAllProducts()
	{
		return service.getAllProducts();
	}

	@PostMapping
	public Product addProduct(@RequestBody Product product)
	{
		return service.addProduct(product);
	}

}
Step 5: application.properties
In application.properties file, we should add Database Details, its credentials, JPA Settings and Logging Level.
#spring.application.name=ECom
#spring.datasource.url = jdbc:h2:mem:testdb
#spring.datasource.driverClassName = org.h2.Driver
#spring.datasource.username = sa
#spring.datasource.password =
#
##JPA Settings
#spring.jpa.database-platform = org.hibernate.dialect.H2Dialect
#spring.jpa.show-sql = true
#spring.jpa.hibernate.ddl-auto = update
#
##H2 Console Settings
#spring.h2.console.enabled = true
#
#
#spring.h2.console.path=/h2-console
spring.sql.init.mode=always
#spring.sql.init.data-locations=classpath:data.sql
spring.application.name=ECommerce
spring.datasource.url=jdbc:postgresql://localhost:5432/ecommerce3
spring.datasource.username=ecom3
spring.datasource.password=ecom3

# JPA Settings
spring.jpa.properties.hibernate.dialect=org.hibernate.dialect.PostgreSQLDialect
spring.jpa.show-sql=true
spring.jpa.hibernate.ddl-auto=update

logging.level.org.hibernate=DEBUG
Please note here, As we proceed with PostgreSQL, H2 DB part is commented out above. In case, if you want to proceed with H2 Database, Comment (Select lines and Click ctrl + /)
Step 6: DB Creation and User Creation
It’s time to add Database and User now. We covered this part already here.
Step 7: Execute Now.
Execute your application now and check http://localhost:8080/api/products link. As there is no data added to Table, No results will be shown.
Step 8: Insert Data
In Terminal, after connecting to DB (From Step 6), insert data to Product Table.
insert into product(name, description, img, rating, price, stock)
values ('prod-1', 'Good prod', 'link-1', 4, 10000, 10);
insert into product(name, description, img, rating, price, stock)
values ('prod-2', 'Good prod', 'link-1', 3, 12000, 4);
insert into product(name, description, img, rating, price, stock)
values ('prod-3', 'Good prod', 'link-1', 5, 17000, 8);
Step 9: Execute Application Now.
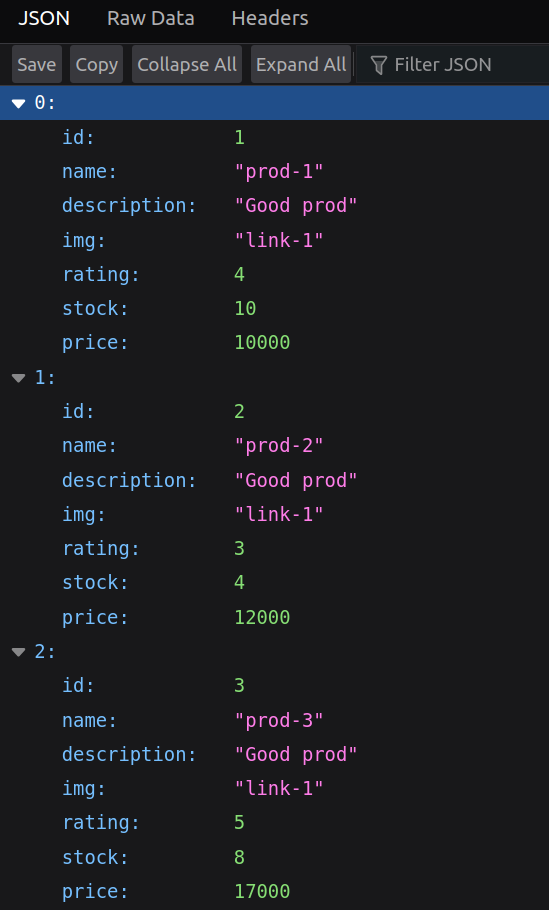
Restart Your project. (Not needed in case we have DevTools as dependency). Go to http://localhost:8080/api/products. You could see results in JSON format. This JSON content will later be consumed by React.
Step 10: PostMan
Open PostMan Application. (Install if you dont have from Software Manager.) For adding new Product to Database through PostMan, the steps are mentioned here.
Hopefully, that’s all here. The next part is Getting these JSON Objects and displaying them in Web through React.